
Sourcing & Verification
Blueprint string reproduced byte-for-byte from community submission #209 on sandustryvault.com and published verbatim. We have not re-tested it in our own save. Footprint, power draw and throughput are not published by the source, so we do not state them.
Design Intent & Problem Solved
Add lava in the top for the thermal buffer and add lava in front of the pyro dispenser. The lave will fall down will gather above the dors. If the green sensor is full with lava, the doors will open until the pink sensor is empty (i added two if one is stuck and does not send a green signal). The lave then buns the stratacore for sand and will convert to cinder at the bottom. The cinder gets transported back to the top and the pyro dispenser melts the cinder to lava again. Add some digger drones pointing to the center of the stratacore for more sand mining. Refill the lava basin for the thermal buffers from time to time.
Layout Render from the Original Submission
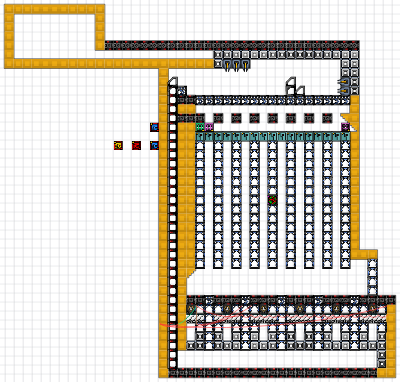
Layout Evidence & In-Game Captures
Machinery & Source Data
Machinery Types in the Payload
- Conveyor Right Mk 2
- Filter Wall Mk 2
- Snowmaker
- Thermal Relay
- Filter Right Mk 2
- Signal Gate
- Heat Cannon Left
- Heat Cannon Down
- Signal Sensor
- Conveyor Left Mk 2
- Launcher Up Mk 2
- Signal Nor
- Signal Not
- Signal Presence Sensor
- Signal Or
- Earth Stratacore
- L
- D
Community Adoption
- 18 in-game copies reported
- 26719 character string
Source Tags
- farming
- sand
- late-game
Reported Footprint & Power
- Footprint: not published by the source
- Power draw: not published by the source
Safe Placement & Cold-Start Checklist
- Place the module in open space with 2-block perimeter clearance before connecting production lines.
- Confirm research prerequisites, conveyor speed match, and liquid drop-pipe heights.
- Leave an inspection gap so any blocked Shaker or mineral slurry overflow can be drained safely.
- Verify power grid capacity satisfies the initial startup spike before feeding raw ore.
⚠️ Known Failure Modes & Anti-Clog Safeguards
Not reproduced in our own save yet, so no failure modes are confirmed here. Check the linked original submission for any notes from the author.