
Sourcing & Verification
Blueprint string reproduced byte-for-byte from community submission #204 on sandustryvault.com and published verbatim. We have not re-tested it in our own save. Footprint, power draw and throughput are not published by the source, so we do not state them.
Design Intent & Problem Solved
1. Place Redveaver in top left box (red) 2. Place Moonhop in top right box (orange) 3. Place Terracortex in the top middle box (green), in the first empty place of the small green box. 4. Deploy digger drones in line with the Terracortex and just on top of the planter box. 5. Place Flux Emanator on the bottom left yellow funnel. 6. Place Recall Portal in the bottom middle yellow funnel. 7. Place Voidgrazer in the pink box in the bottom.
Layout Render from the Original Submission
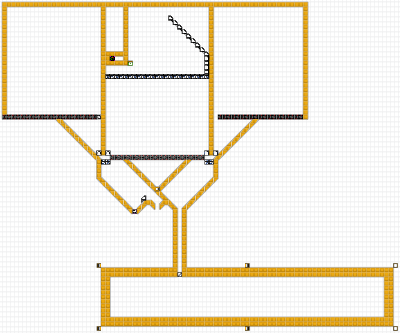
Layout Evidence & In-Game Captures
Machinery & Source Data
Machinery Types in the Payload
- Conveyor Right Mk 2
- Filter Right Mk 2
- Earth Stratacore
- Conveyor Left Mk 2
- Critter Fence
- Filter Wall Mk 2
- D
- H
- L
- P
- X
- T
- X
- P
- T
Community Adoption
- 19 in-game copies reported
- 8067 character string
Source Tags
- farm
- fluxite
- void juice
Reported Footprint & Power
- Footprint: not published by the source
- Power draw: not published by the source
Safe Placement & Cold-Start Checklist
- Place the module in open space with 2-block perimeter clearance before connecting production lines.
- Confirm research prerequisites, conveyor speed match, and liquid drop-pipe heights.
- Leave an inspection gap so any blocked Shaker or mineral slurry overflow can be drained safely.
- Verify power grid capacity satisfies the initial startup spike before feeding raw ore.
⚠️ Known Failure Modes & Anti-Clog Safeguards
Not reproduced in our own save yet, so no failure modes are confirmed here. Check the linked original submission for any notes from the author.